The Safex Big Box Store 201: Approved Merchant Walkthrough
This article provides a step-by-step walkthrough and explanation of the Approved Merchant experience when using the Safex Big Box Store software suite.

This is the fifth in a series of articles, which looks to provide a complete set of tutorials regarding all aspects of the Big Box ecosystem. The articles in the series (including this one) are:
- Big Box 101: Introduction & Explanation
- Big Box 102: Installation & Setup
- Big Box 103: Basic Safex Wallet Functions Walkthrough
- Big Box 104: Shopper Walkthrough
- Big Box 201: Approved Merchant Walkthrough
- Big Box 301: Independent API Merchant Walkthrough (separate software release)
Each article builds on the information provided in preceding articles, and this article assumes the reader has previously read the 101, 102, 103 and 104 articles in the process of learning about the Safex Big Box Store ecosystem, subsequently installing the software, and gaining an understanding of the Shopper experience. The target audience of this article is merchants wishing to sell items via the Big Box Store. As such, it is considered suitable for advanced-level users who wish to sell their wares on the Safex Marketplace.
Having reached this article, it is expected that the reader is now familiar with the windows and processes of the Big Box Store Wallet, so explanations will at times skip over more obvious window progressions, without necessarily including all screenshots in the sequence..
Note: All screen captures of the Big Box Store (and Store Front API) used in this article are of the testing “Stagenet” version. All addresses, coin balances and offers are fake and are for testing purposes only. The api.safex.ninja URL is a demonstration Store Front used for testing and cannot be accessed on the mainnet live version to buy real products. The active Mainnet Big Box Store Front API URLs are specified later in these instructions.
Jump to Active Safex (Mainnet) Store Front APIs.
Create a Merchant Account
Prior to being able to sell anything on the Safex Marketplace, a user first needs to create a Safex Account, aka a Merchant Account. It is assumed the reader has already familiarized themself with the previous articles in this series, and has a functioning Safex Wallet on the Wallet page.
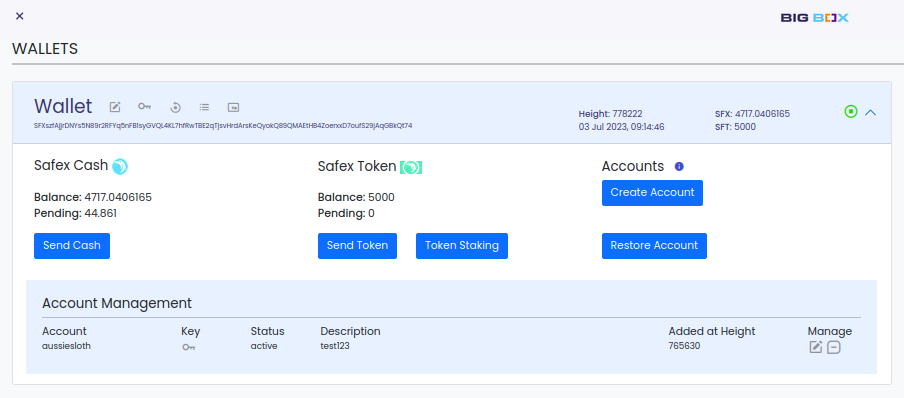
On the Wallet page, the user should select the wallet they wish to use to create the Merchant Account. It will need to have a small amount of SFX to cover transaction costs, and at least 1000 Safex Tokens in the available balance, which get locked for approximately 30 days (22k blocks specifically) for each Account name created.
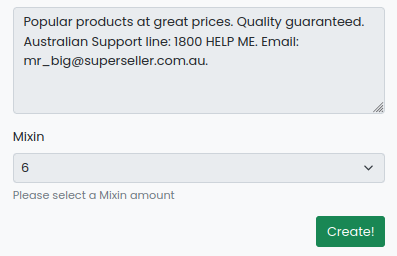
Click the Create Account button in your chosen wallet and a popup will appear, allowing you to enter the account name you want to create on the blockchain. You can also add some description text, which could include your business email address, for example.

Click the Confirm Button and check the details are correct.
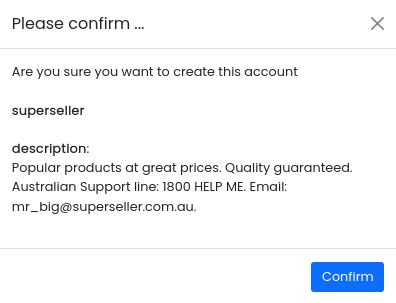
Once confirmed, you can now click the Create! Button and send the transaction to the blockchain for processing.
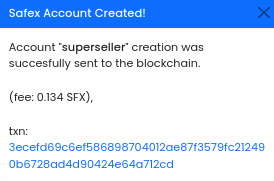
If you enter an account name that already exists, you will get an error when you try to send the transaction to the blockchain for processing.
Otherise, the account name will get created and you will be presented with a new line item in the Account Management section. You should immediately click the Key symbol on the new line and make suitable backups of your Safex Account Secret key. TREAT THIS KEY JUST AS YOU WOULD YOUR PRIVATE WALLET KEYS - BACKUP IMMEDIATELY. You need both the Safex Account name and Safex Account Secret key to Restore the account in the future, or perhaps on another wallet address.
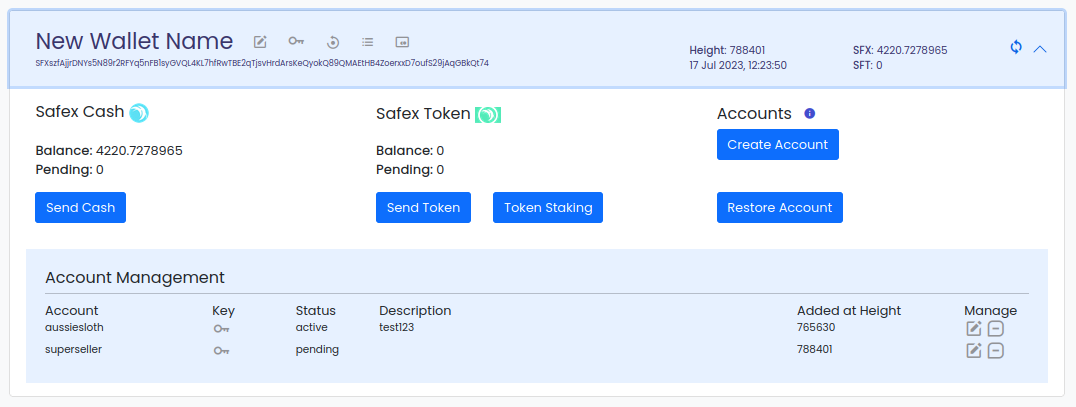
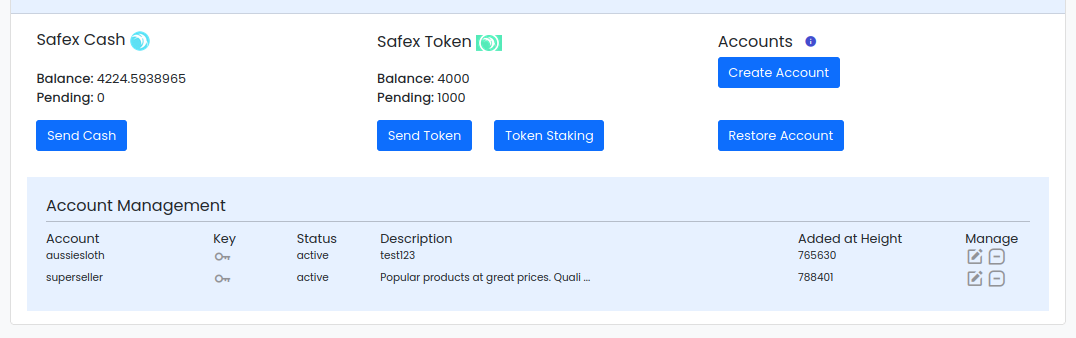
You will notice that 1000 SFT will disappear from your Available Balance. (Depending on the makeup of your coin outputs, a higher amount of coins may initially disappear, the change will return to your wallet once the transaction is processed. For more info on this, please refer to this source.
The 1000 SFT will return again after 22k blocks. This SFT lockup method was used to minimize the ability to spam the blockchain with high volumes of account creation transactions.
After 10 blocks have passed, you will need to refresh the webpage to allow the Merchant account to change from Pending to Active. It can then be used to list offers on the Safex blockchain.
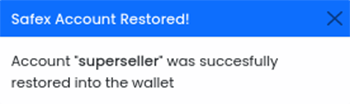
Restore a Merchant Account
If you have a preexisting Safex Account name and key, then use the Restore Account button and enter the information into the corresponding fields. It costs nothing to Restore an Account into a Wallet, as the Account already exists on the blockchain.
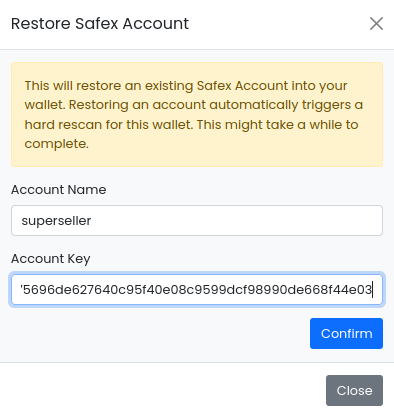
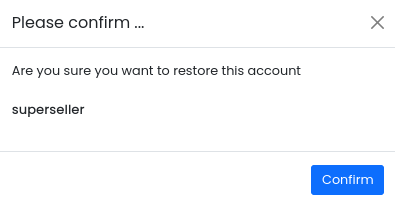
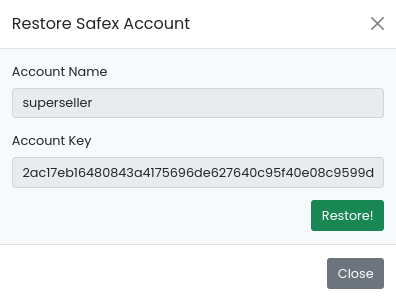
Click Restore! and the Wallet will check the information is correct on the blockchain, and then restore the account into your selected wallet.
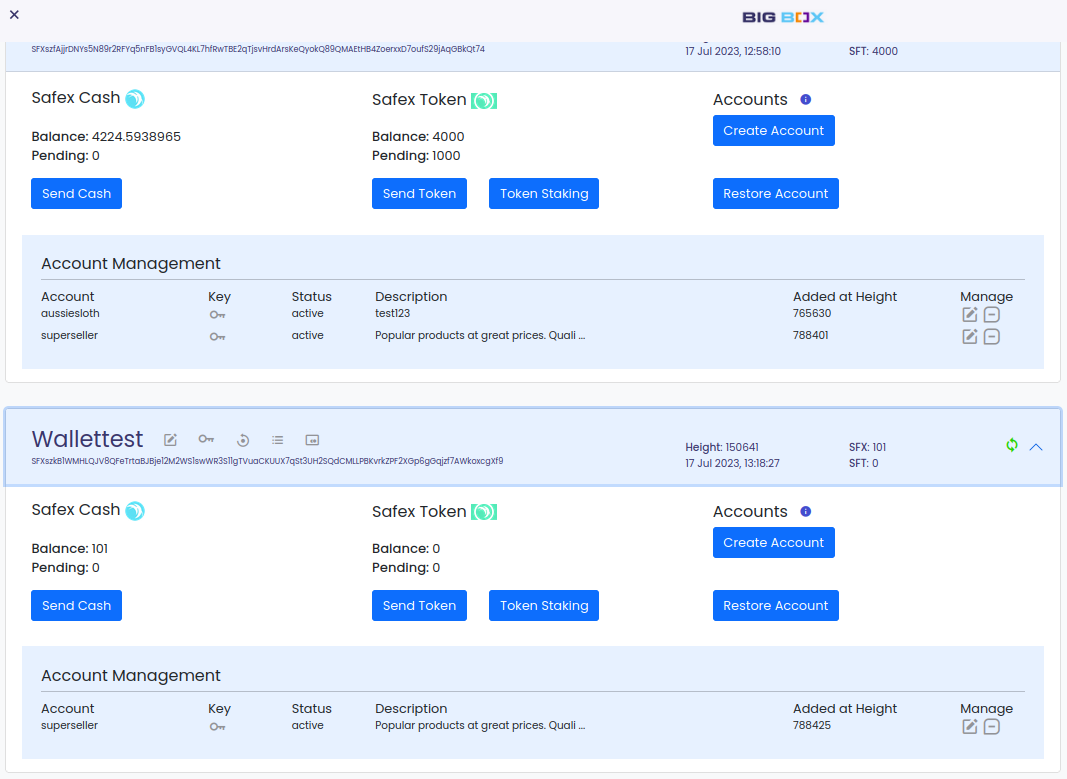
In the above image, you can see the Account “superseller” was created in New Wallet Name, which held the SFT (the 1000 SFT are showing as Pending), then Restored into Wallettest, which only holds SFX. If the plan is to use Wallettest wallet for selling goods, you can Remove the account from New Wallet Name, to avoid any confusion. Just be sure you have made suitable backups of the account information.
Remove Account
To Remove the account, click the [-] button in the manage section (far right) of the Account Management area of New Wallet Name. There is no transaction fee associated with removing an account, as it is only a local wallet command.
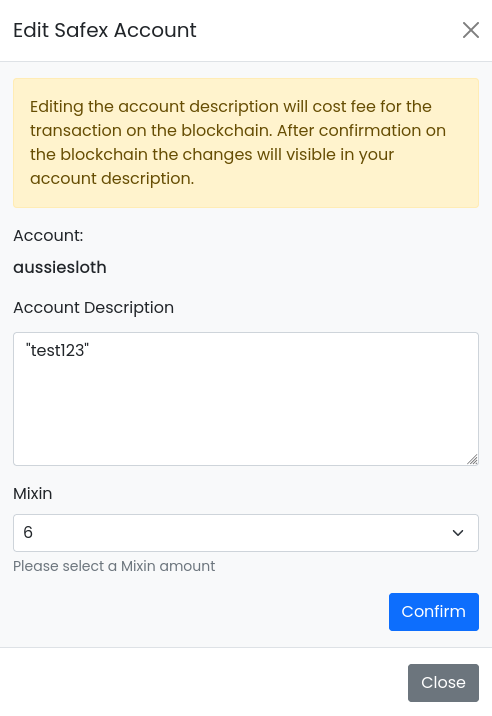
Edit Account
If you need to change the Description of an Account, then you click the edit button to the right of the account you wish to modify. Account names CANNOT be changed. An Account edit has a corresponding transaction and txn fee, as it updates the information stored on the blockchain.
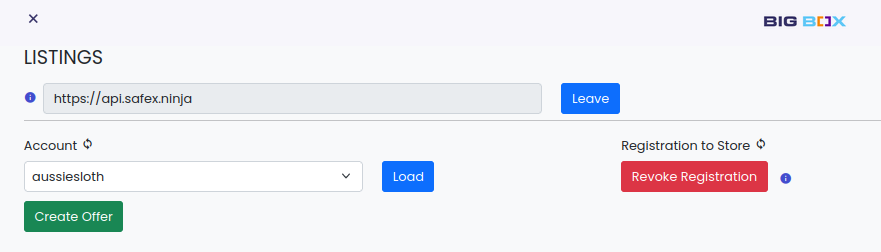
Listings Page
Prior to using the Listings Page, you first need to have a Safex Wallet with a Safex Merchant Account Active in the Wallet section of the current Big Box user.
Once a Wallet and Account is active in the current Big Box user, the page changes to:
The first field allows merchants to enter a valid Big Box Store Front API URL.
The Accounts section is used by:
- Prospective Merchants - to get their merchant account name approved by the Big Box Store Front owner.
- Approved Merchants - to select the account name they wish to manage.
Prospective Merchants
After entering the Big Box Store Front API URL they wish to register with, select the merchant account name in the Account dropdown menu that you wish to register. Then clicking the Register button to the right of the dropdown, and a toast will popup in the bottom right corner of the screen, confirming that you have successfully made a registration request to the Store Front.
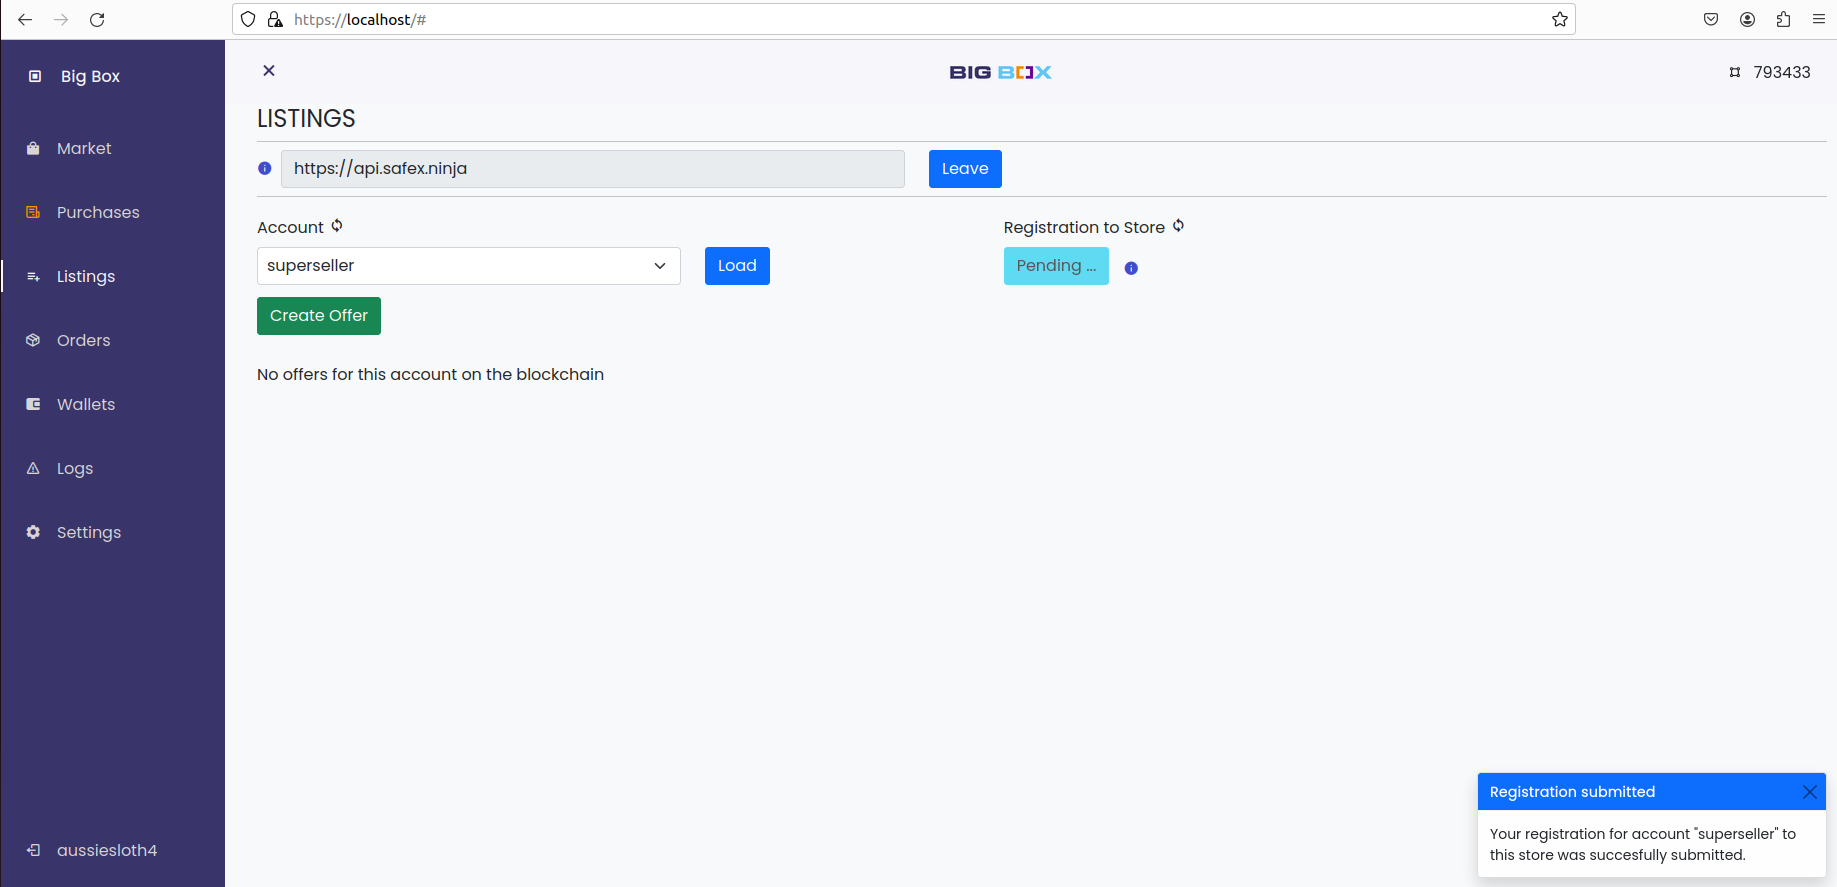
If the Merchant is operating their own Big Box Store API, then they can approve their merchant account in their API as soon as they send this request. Otherwise, the Merchant needs to wait until their Registration request has been approved by the Store Front owner.
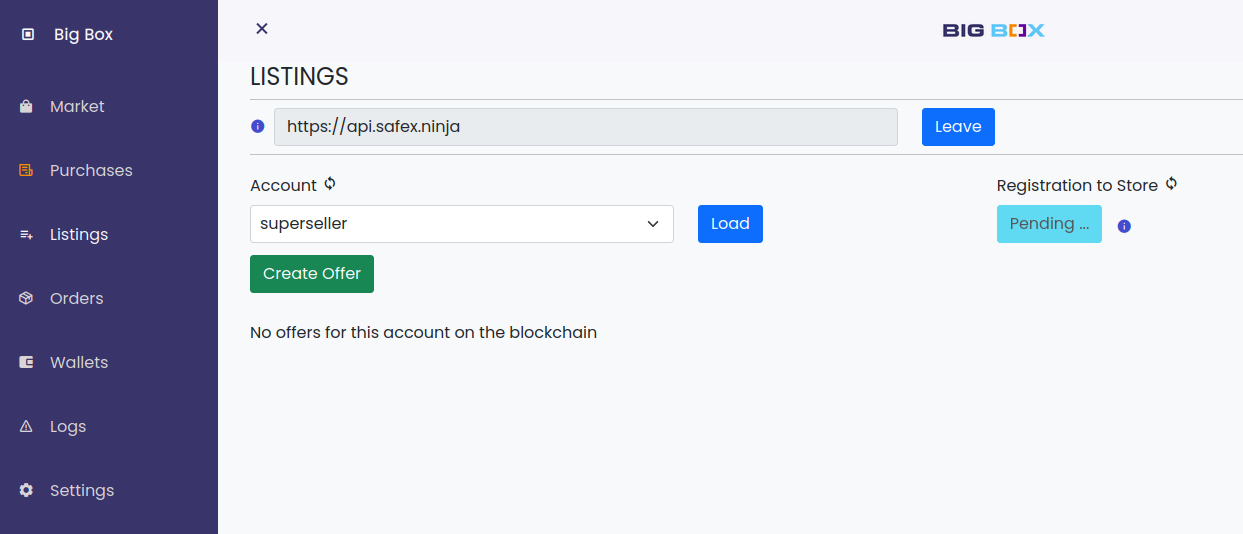
The Listing page will show as Pending for that account name until actioned by the Store Front owner:
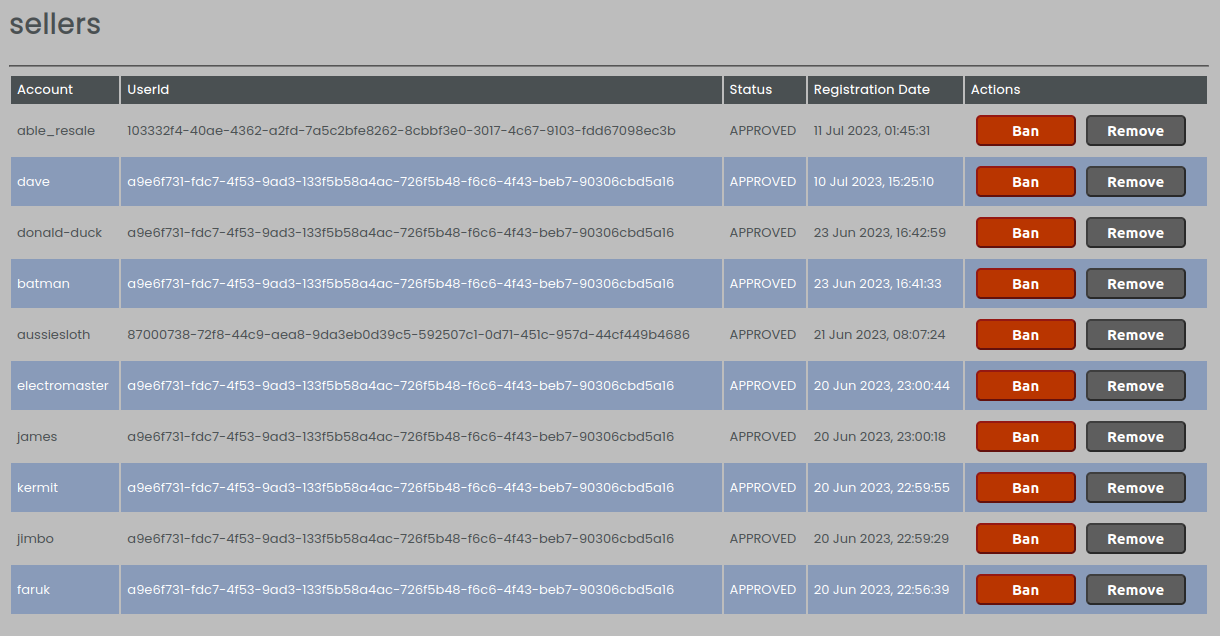
The Store Front owner sees the new Merchant Account appear on their API display:

The Store Front owner can then either Approve or Remove the seller request. Subsequently, if the Store Front owner needs to Ban the merchant, they can do so.

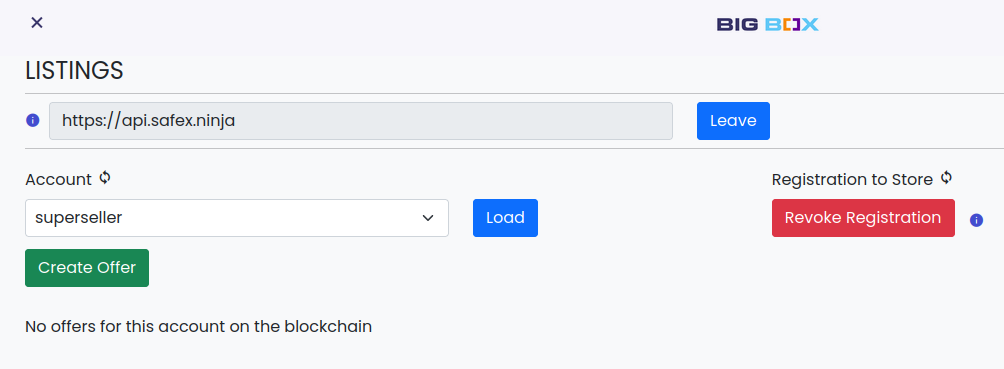
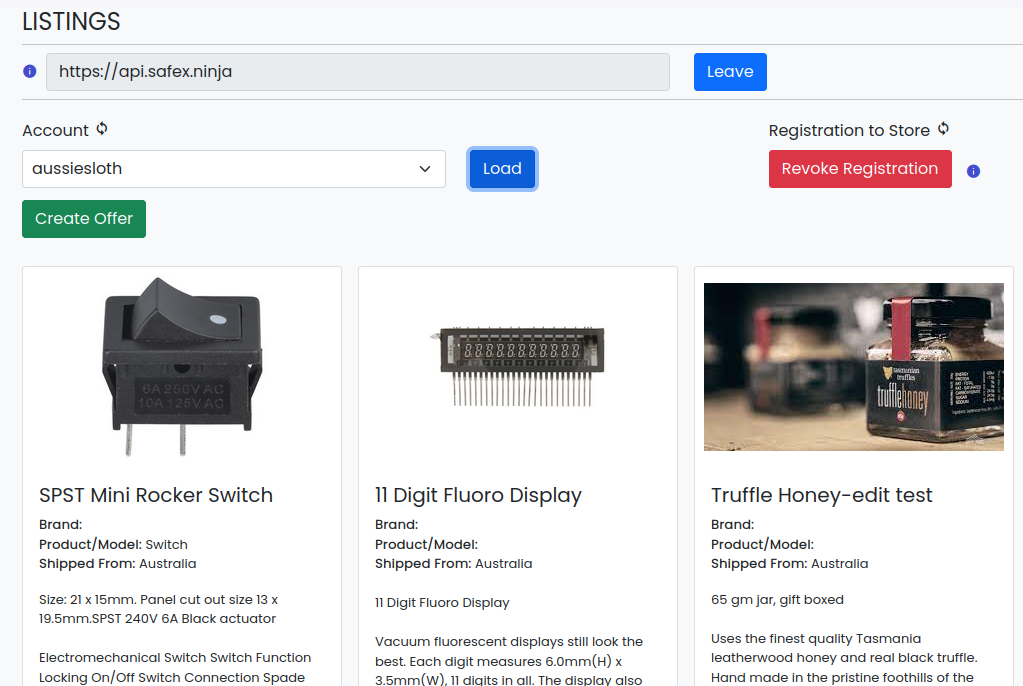
Once Approved by the Store Front owner, the Listing page will then show:
Merchants can register with multiple Big Box Store Fronts, if more than one exists that suits their needs. Simply click the Leave button to the right of the Store Front URL and then enter another Big Box Store Front URL and repeat the above Merchant Registration process, as needed.
In that above example for “superseller”, the account has not yet created any Offers, so when loaded it states there are no offers on the blockchain for that account.
If an account already has listings created on the blockchain, then when the Load button to the right of the account name dropdown is clicked, those preexisting offers will populate.
Important Note: The wallet allows for merchants to revoke the registration to the Store Front. Revoking your registration will break communication with customers. Make sure you don't have any open offers that still require communication with the customer.
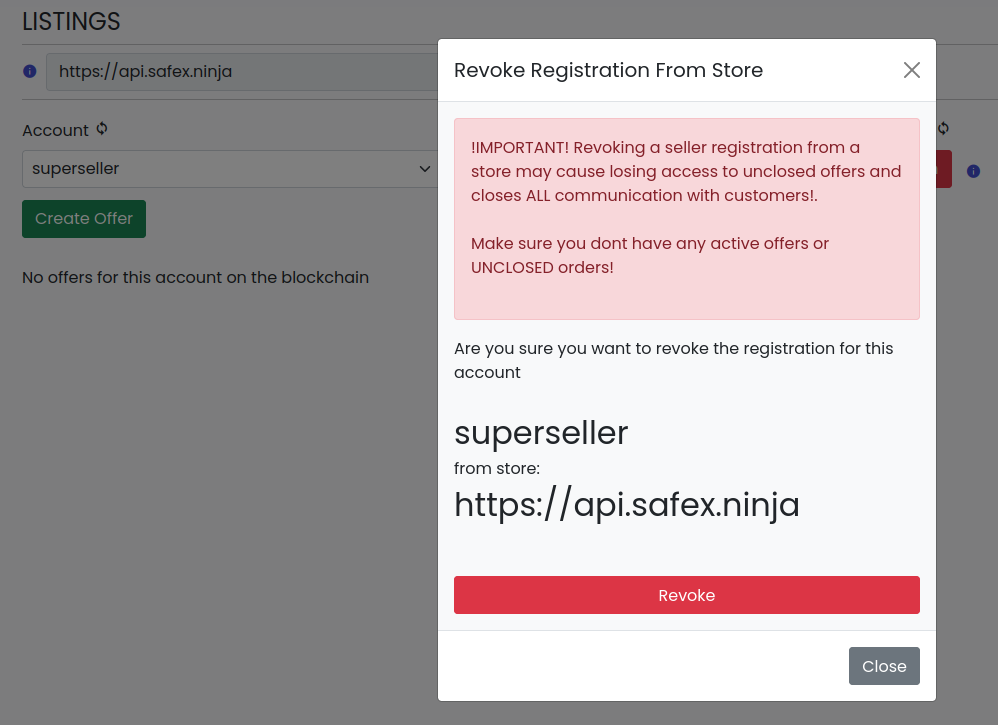
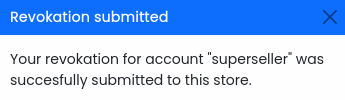
The account is automatically removed from the Store Front when you Revoke the account registration:
Requesting Approval to offer goods for sale on a particular Big Box Store Front.
It is envisaged that each Big Box Store Front API operator will provide information via a website on how prospective merchants seek pre-approval to offer products via their curated Store Front, and whether any additional merchant information, or a formal application process, is required.
Active Safex (Mainnet) Store Front APIs
The following links can be used to connect to Big Box Store Fronts. Simply copy and paste the link into the Store Front API section (left of the Leave button) of the Listings page of the wallet.
A quick word about product image URLs and the use of image hosting platforms.
Merchants who already have a web presence for their products will be able to simply link directly to their own image URLs on their website/s. However, for Merchants without such access, they will need to use the services of an image hosting website, of which there are many to choose from.
While the below list is far from comprehensive, it will give users a starting point in finding an image hosting site that suits their needs:
- https://postimages.org/ - the good thing here is that you can resize the image on uploading, and it gives the correct hotlink url as one of the results. It has some restrictions on commercial use, but you can use it for commercial use if you legally uploaded the content / you own the copyrights " Posting photos of goods you sell is okay; ripping off a competitor's catalog is not."
- These have almost no restrictions and are good, but after uploading you need to right click and copy the image link, then paste into the Create Listing field:
- https://imgbox.com/
- https://www.imagebam.com/
- https://www.imagevenue.com/
- https://imageshack.com/ - this one has good reviews, but it requires a paid subscription if it is for business / commercial use.
Users should consider their own needs and ensure they comply with the terms and conditions of such image hosting sites.
Create a New Listing
The green Create Offer button allows a merchant to create a new offer on the blockchain.
A popup appears which gets filled with all relevant product information and quantity available.
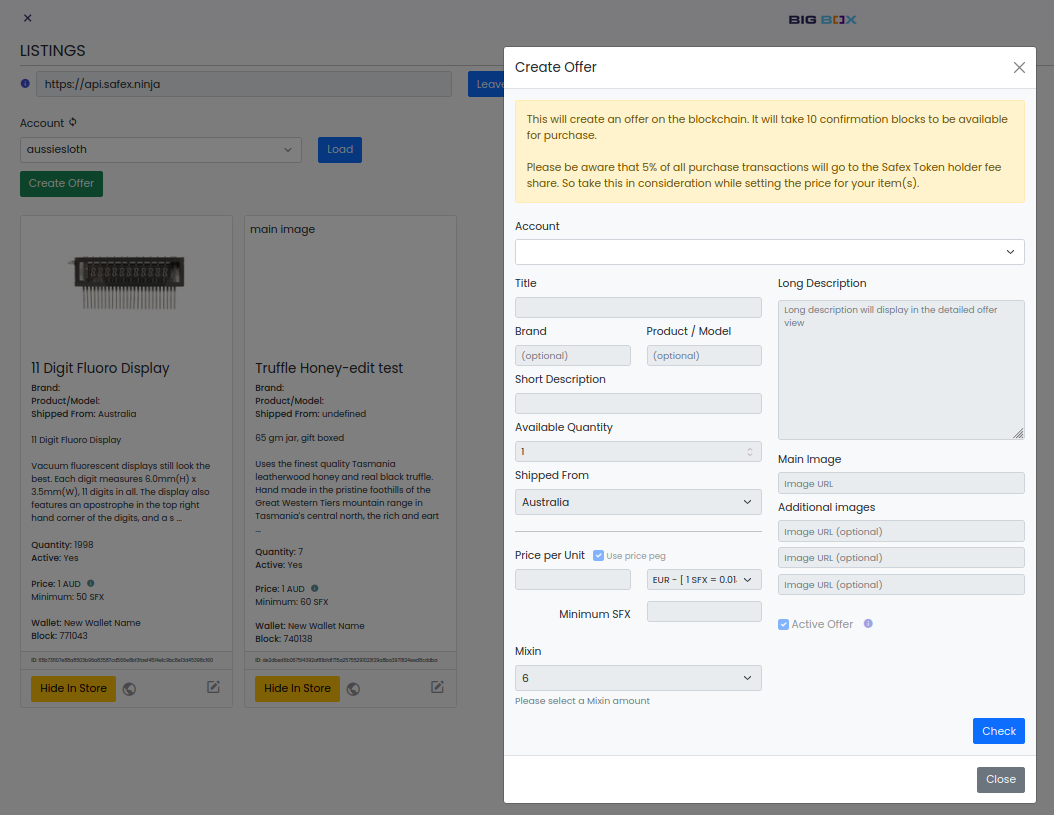
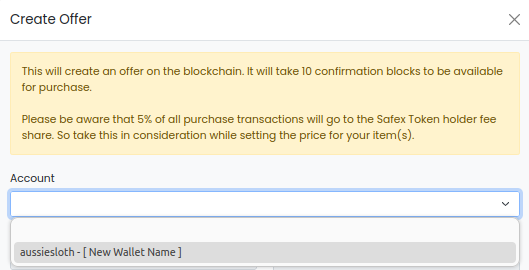
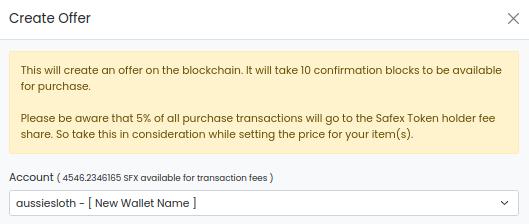
You first select the merchant account (& wallet) you wish to use to create the offer on the blockchain. Once selected, the wallet address shows your SFX balance, to ensure you have sufficient SFX to cover the transaction fee.
You then enter all the relevant information into the remaining fields. Multiple image urls can be included for the item being listed.
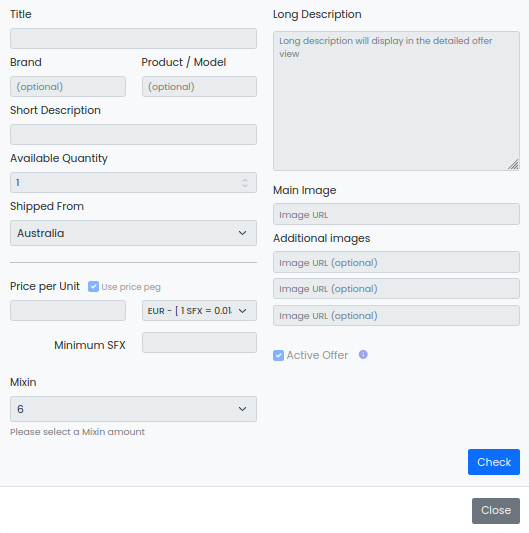
Once all information is entered, the Check button is clicked and the wallet checks for technical errors, and if all clear, displays a confirmation window. Click the Done button to return to the Create window, and a new Create! button now appears, allowing the transaction to be sent to the blockchain, once clicked. 10 blocks after being created, the listing will display below the Create Offer button. Click the refresh icon (twin arrow circle) if the new listings don’t automatically appear.
Items listed below the Create Offer button will either display a Show in Store button or a Hide in Store button along with an Edit button to the right.
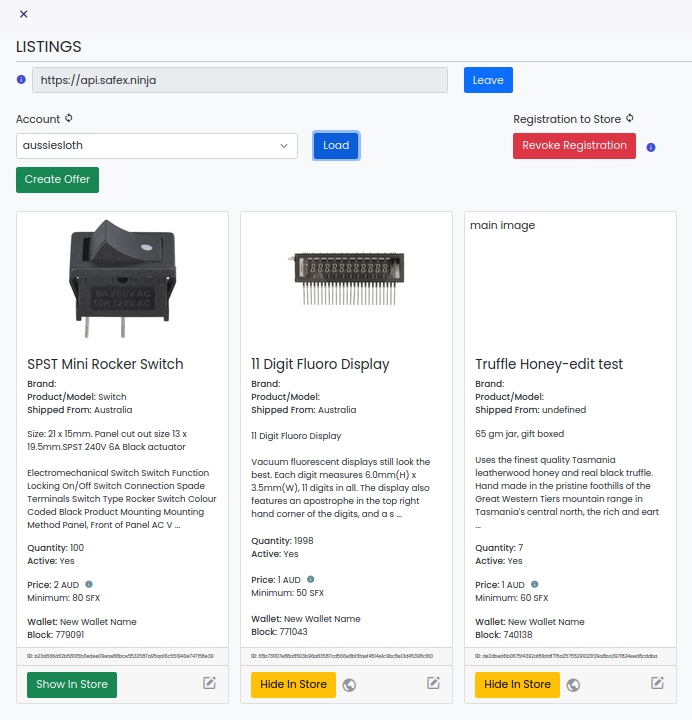
Merchants click the Show in Store button in order to have that item register with the Big Box Store API and appear in the Market page. Click the Show in Store button triggers a popup window that allows the merchant to select where in the world they deliver the product to. They simply click all relevant tick boxes for those regions.
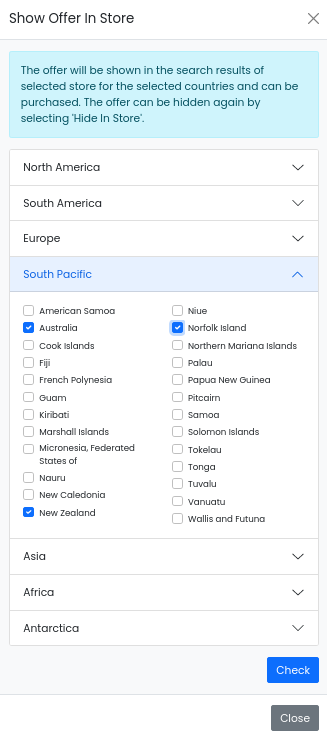
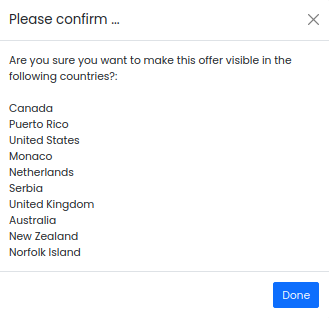
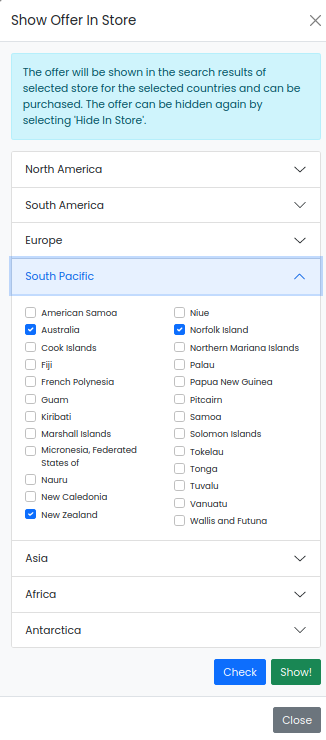
Click the Show! button to list the item in the Store Front you’re connected to.
To remove a previously approved item from display, the merchant clicks the Hide In Store button.
Clicking the Edit button allows the user to restock the quantity available, or change other details of the listing. After editing, the listing will disappear from the Market page until the 10 confirmation blocks for the edit transaction have completed.
Orders
The Orders page is only applicable if you are a merchant selling items. If so, it shows all your past merchant sales within the Big Box Wallet. The page auto refreshes and checks for new messages every minute. The auto refresh can be turned off, and the twin arrow circle to the right of the Auto refresh allows the user to manually refresh at any time.
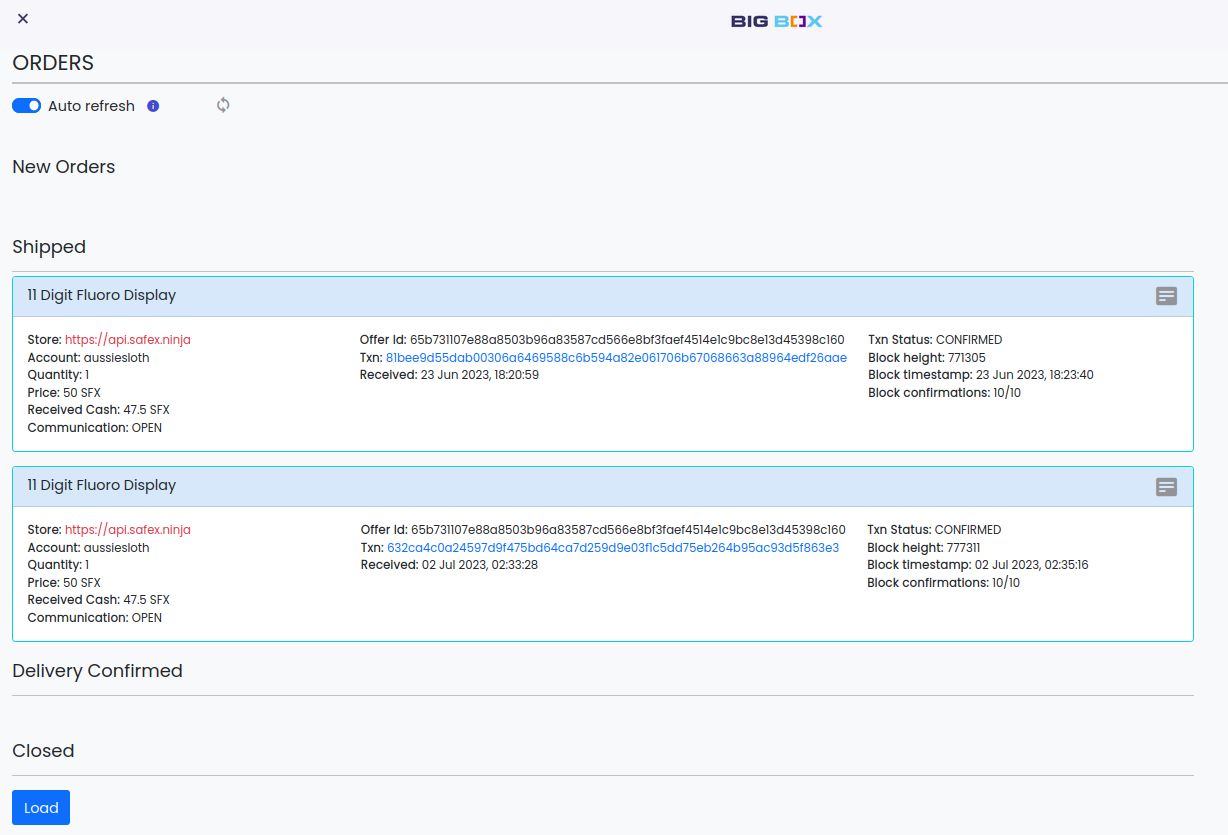
As with the Purchases page, above, incoming orders are only considered complete once there have been 10/10 block confirmations. Additionally, for incoming Orders, all transactions are verified using a txnProof check of the receiving wallet, to ensure payment has actually been received, before the order receives its Validation tick. Once validated, the Merchant can be confident that payment has been received, and they should then ship the purchased product to the Shopper.
The page is broken into 4 sections, based on the status of past orders:
- New Orders
- Shipped
- Delivery Confirmed
- Closed
As each sales order gets processed (Payment and Purchase confirmed | Shipped | Delivered), it progressively moves automatically from one section to the next, triggered by either Buyer or Merchant clicking the relevant button in the Message & Management (see the separate explanation, further below) P2P chat window for that purchase.
In this way, all items sold move through the Order workflow in a smooth fashion.
Final Thoughts
That concludes the explanation of how to Create/Restore a Merchant Account, become an Approved Merchant, offer products for sale and interact with customers in the Safex Big Box Store.
If you prefer to be an Independent Merchant using your own Big Box Store Front API, you can now move onto the next article in the series, Big Box 301: Independent Merchant API Walkthrough, which takes you through setting up your own API.