Using xmrig-proxy for multiple Safex mining rigs
This article explains the process needed to switch your Safex mining rigs over to an xmrig-proxy instance, rather than having all the rigs pointed directly at your preferred mining pool.

There are several reasons why you may want to change to using xmrig-proxy, rather than having all your miners pointing directly at the mining pool:
- Privacy - large miners don't necessarily want the mining pool knowing exactly how many mining rigs they’re operating. By using a proxy, the pool only sees a single incoming connection for all the rigs using the proxy.
- Avoid pool bans - If you have a large number of miners all communicating directly with the pool, then the sheer volume of shares being sent could be seen by the pool as a DDOS attack, and your IP address could get banned for a period of time. If these bans happen regularly, then it will seriously affect your mining returns.
- It allows for more efficient management of your mining rigs - if you point all rigs at your proxy, then if you need to change pools (eg. your regular pool goes offline), then you only need to change the config entry for the pool url in your proxy, and all rigs are instantly back to mining.
- Reduce the load on the mining pool server - the fewer workers connected directly to the mining pool, the easier it can handle the incoming workload.
Download xmrig-proxy
There are xmrig-proxy releases available for the usual Win/Mac/Linux OSs, along with several other flavors, at github.
Get whichever release is suitable for your OS and extract it from the download archive.
Windows users will likely need to set an exception for the xmrig-proxy folder in their Antivirus program(s).
Compile for custom RPi ARM build
If you plan on using a RaspberryPi as your proxy, then you’ll need to compile the build yourself. This is exactly what I did for my RPi4 running the latest Raspberry Pi OS (which I also run a Safex node on):
- Firstly, do the usual
sudo apt updateandsudo apt full-upgradeto the OS, prior to compiling the new xmrig-proxy build. - Then, follow this command sequence for the Raspberry Pi’s ARM build (Source)
sudo apt install git build-essential cmake libuv1-dev uuid-dev libmicrohttpd-dev
git clone https://github.com/xmrig/xmrig-proxy.git
cd xmrig-proxy
mkdir build
cd build
cmake .. -DCMAKE_BUILD_TYPE=Release -DUV_LIBRARY=/usr/lib/arm-linux-gnueabihf/libuv.a -DWITH_HTTPD=OFF
make
The xmrig-proxy executable will then be compiled.
Create the config.json
If you wish to check the xmrig-proxy configuration options for yourself, head to config.xmrig.com and select the Proxy option, and work your way through the various screen options.
Otherwise, feel free to use my config suggestion below, and make changes based on your preferred mining pool. As I’m in Australia, I’m connecting to the Australian Safex Ninja pool.
Create a text file called config.json and then copy and paste your config info, making changes to the pool address:port (url), your Safex address (user) and mining farm name (pass), as needed.
Basically, I made sure that the settings provided by the pool, in its configuration generator, matched those same lines in my proxy config, and it worked on the first try.
{
"access-log-file": null,
"algo": "rx/sfx",
"background": false,
"bind": [
"0.0.0.0:3333"
],
"colors": true,
"donate-level": 1,
"log-file": null,
"mode": "simple",
"pools": [
{
"algo": "rx/sfx",
"url": "aus.pool.safex.ninja:5511",
"user": "Safex5zWHPNQSpWkxtwA5gFvkb7waYfj2LRJWLHo6jSkXpzJ5WUfgBfJWwz7VFQG1oGsYBefCpP13UrfnpZQuM1zN69wZn7Ekbf32",
"pass": "@sloth-farm",
"keepalive": true,
“enabled”:true,
"tls": false,
"tls-fingerprint": null
}
],
"retries": 20,
"retry-pause": 1,
"syslog": false,
"verbose": false,
"workers": "password"
}
It is recommended that you set a static IP address for the device running the proxy, ideally via your router. This has been explained in previous articles, such as here.
With a static IP address set for the proxy, you can now start the proxy, and then go and make changes to your mining rig config files.
Use sudo ./xmrig-proxy to launch the proxy. I initially used just ./xmrig-proxy (without the sudo) and I got a Segmentation Fault error after attempting to trigger the verbose option in the running proxy, and may have related to a permissions issue. If running the proxy on a Windows PC, then set it to run in Administrator mode.
Reconfigure your miners.
Now, modify the config.json files for each of your miners. You will note in the proxy config above that there’s a bind setting for 0.0.0.0:3333. You now point each miner to that port number. Feel free to choose a different port, but just make sure any port you choose isn't being used by another device on your LAN.
My LAN IP address for the RPi4 running the proxy is 192.168.200.200, so I simply change the url line in the pools section of each miner config to 192.168.200.200:3333, which is the port setting specified in the proxy bind.
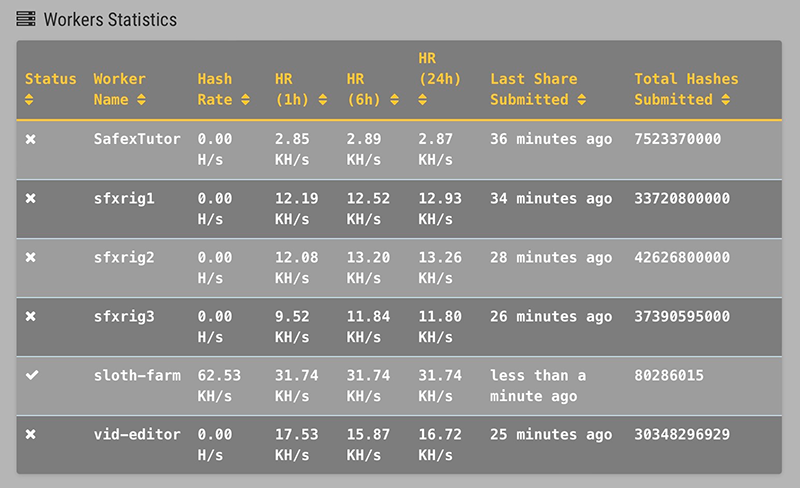
Once your rigs are pointed at the proxy, they’ll show as disconnected (x) in the pool Worker Stats after about 10 minutes, and your proxy will show as connected, and reflect the cumulative hashrate of your rigs now pointed at your proxy. As usual, the hashrate varies, based on the accepted shares being sent to the pool at any given time, but the 24-hour average will give a fairly accurate reflection of the work being performed.
Observations
Connecting mining equipment with vastly different hashing power resulted in an apparent drop in shares being sent to the pool by the rigs of lower hashing power. It may have simply been a short-term aberration, but I decided to ultimately point all the dedicated 24/7 3900X rigs at the proxy, and left my part-time miners - laptop and 5950X video editor - pointed at the pool itself. This resulted in (what appeared to be) a much more stable frequency of submitted shares, while still reducing my number of connections to the pool.
Solo mining
With the necessary config changes, you could also point the proxy at your own node, for solo mining.
Having lots of people solo mining is the truest representation of maximizing miner privacy and furthering the ethos of a decentralized blockchain. However, the author accepts that many people prefer the steady stream of coins generated via pool mining, compared to the potentially more erratic short-term returns of solo mining.
In the long term, both pool and solo mining should result in the same mining returns, with a statistically small margin of error.
Final Thoughts
Under no circumstances should you mistake the tutorial, above, as my having some kind of expertise with using xmrig-proxy. Prior to my research and efforts needed for the preparation of this article, I had never previously used xmrig-proxy. There may be many ways to customize and tweak the software of which I’m unaware.
However, it worked straight out of the box for me, so should be easily accessible to those many users who may also be novices to the world of mining proxy software, and those are the users who are the target audience for this article.
I hope you find this helpful.