Selecting Another Daemon Host for Faster Safex TWM Wallet Access
This article explains the benefits of connecting your Safex TWM Wallet to a different Daemon Host to increase sync speeds, rather than simply leaving it on the default host setting.

When using the TWM Wallet, it needs to connect to the blockchain - to sync the blockchain and update your transaction history and coin balances, and allow new transactions to be sent and processed.
For convenience, the TWM wallet defaults to the rpc-node connected to the rpc.safex.org url address, provided by the Safex Foundation.
Whilst it is helpful to provide a default host, users around the world can have vastly different experiences when using the default rpc-node, due to the load on the host (the number of users simultaneously accessing it), their internet speeds generally, and their geographic distance to the host.
However, there are several different ways in which Safex Wallet users can connect to the blockchain:
- Default Host.
- Self Hosted Full Node running on the same machine as the Wallet software.
- Self Hosted Full rpc-Node on your home network.
- One of the rpc-Nodes hosted by Safex community members, located all around the globe.
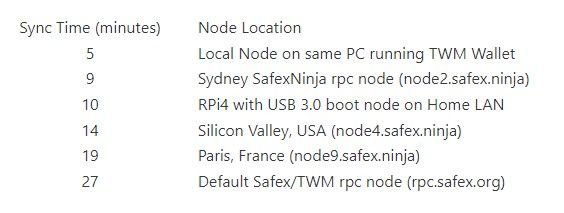
The node you connect to can make a tremendous difference to your wallet sync speed. A recent test conducted by the author (based in Tasmania, Australia) gave the following results for a Hard Rescan:
The benefits of running your own node (either Option 2 or 3) include:
- Support and enhance the decentralisation of the Safex network;
- Faster wallet syncing; and
- Offers improved privacy/security, as you aren’t sending transactions from your wallet across the internet to a third-party node.
For members of the Safex community who stay updated with the project on a daily basis, and also have an ‘always on’ computer at home, Options 2 or 3 would be the fastest and most suitable option.
However, this is important:
Running a Node requires you stay updated with project development, to ensure you perform software updates to the safexd software whenever new updates are released.
If you fail to keep your node updated, you will no longer be supporting the network, and attempts to connect your wallet via your node will result in you not being able to perform transactions at the correct blockheight, as your node will have been banned/blacklisted by those nodes running the correct software version.
Always perform updates as soon as practicable after code updates are released by the development team.
Let us look at each option in detail…
1. Default Host.

You may not feel technically competent to go selecting another node. Simply don’t change anything and open your TWM Wallet just as you always have.
However, it is our hope that this article provides sufficient information to allow users to select a faster option, so please continue reading through the information presented below.
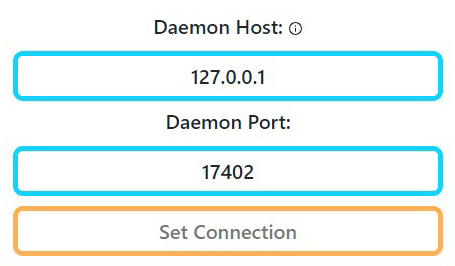
2. Self Hosted Full Node running on the same machine as the Wallet software
Instructions for running a node on your home PC can be found here.
To connect your wallet to the node on the same machine you simply type 127.0.0.1 into the Daemon Host field of the Wallet. Leave the Port unchanged.
3. Self Hosted Full rpc-Node on your home network.
If you wish to have a node on your home network, but access it from a different PC (maybe you keep your wallet software on a different PC for security purposes), then you can use the instructions for running a node on your home PC, as found via the link above, but you then launch the node using a different cli command.
./safexd --rpc-bind-ip 192.168.200.200 --confirm-external-bind --restricted-rpc
*where 192.168.200.200 should be replaced with the LAN IP address of your PC/Device hosting the node.
Then, from any PC on your home network, you can launch your TWM Wallet, and simply specify the LAN address of your private rpc-node:
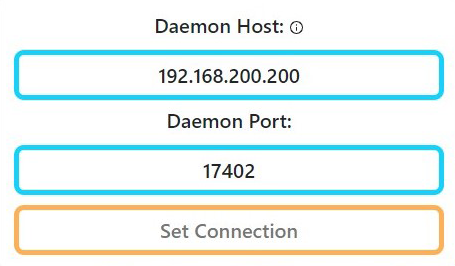
If you have started your node in this configuration, and then decide to launch your TWM wallet from the same PC, you still need to use the LAN IP address to connect to it, as the 127.0.0.1 address will no longer work (because the node has been bound to the specified LAN IP address).
If you have followed our dedicated Raspberry Pi node build article, and started it in rpc-Node mode, then you also just specify the LAN address of the RPi hosting the node.
4. Hosted SafexNinja rpc-Nodes
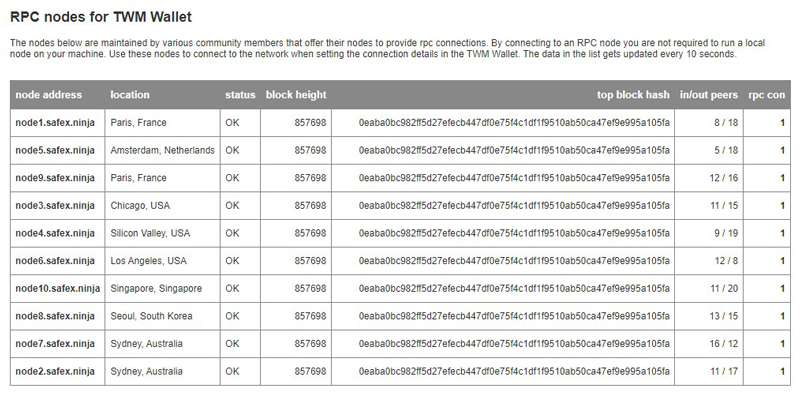
If you don’t stay updated with the project on a regular/daily basis, then running your own node probably isn’t the best option for you. However, you can still very simply access a node close to you by checking out the list of rpc-nodes hosted by Safex Ninja.
As you can see in the graphics below, there are nodes in many parts of the world, and connecting to the closest one of these as your Daemon Host also provides the additional benefit of reducing the workload on the default host, which helps others.

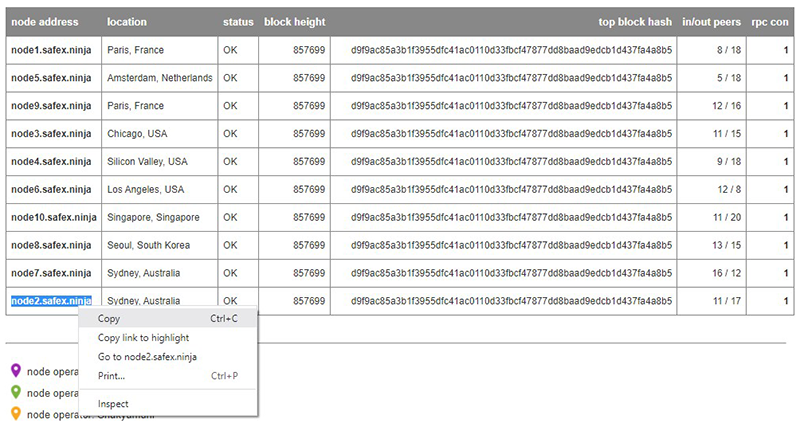
Simply find a node address at the closest geographic location to you.
Copy the node address and paste it into the Daemon Host field of the wallet. Do NOT change the Port information. Continue as normal to open your wallet.
Final thoughts
Regardless of which of the above methods you choose to use, the wallet still needs to sync to the current top block before you use the wallet to send coins, stake/unstake SFT, or make purchases on the Market page.
Selecting a node close to you will accelerate the sync speed, meaning you don’t have to wait as long, but keep in mind that if you haven’t opened your wallet in a few months (or longer), then you will still need to wait a few minutes for the wallet to finish syncing.
So anytime you open your wallet, just be patient when it first opens up, and give it time to complete syncing the blockchain.