Installing and running the Safex One-Click Miner | Windows
Safex One-Click Miner is published. Follow our instructions, download Simple One-Click miner, and start earning Safex Cash.

The new Safex One-Click Miner has been released for the RandomSFX algorithm, allowing computer novices to easily start mining Safex Cash on their PCs. If you’ve been avoiding mining because you didn't have the confidence to setup xmrig and configure it, then the One-Click miner is your ticket to getting started.
Outlined below are all the steps you need to take in order to be mining Safex Cash in just a few minutes time.
But first, a note of AntiVirus Programs, and how many treat crypto mining software:
Whenever a software developer releases a new piece of software, they need to undertake some checks to see how their software will be treated by the plethora of AntiVirus (AV) companies. To do this, they submit the software to VirusTotal, a website that analyses what threats the software will likely trigger for all AV companies.
As you can see below, for the Windows release of the 1-Click Miner, there were a range of False Positive threats detected for 25 of the 65 AV companies.

The reason why these various AV companies flag the software is because crypto mining code is often used in malicious malware software, where it will covertly mine crypto on an infected PC, and some AV companies have a blanket FLAG policy for any crypto mining code they detect.
All of the AV companies that flagged the One-Click Mining software have been contacted, and it was explained that the software is an intentional crypto miner, where the user must manually start the mining process.
Even so, several replies indicated that the flag would not be removed, simply because their blanket policy is to flag all crypto mining code.
Therefore, you may get a virus warning if you attempt to install the 1-click Miner without disabling your AV software, and setting exclusions (aka whitelist), as outlined below for Windows Security. We obviously can't explain the process for every single AV program on the market, so if you have any other AV software installed, particularly if it is a company from the image above, then you will need to take the necessary steps to whitelist the One-Click Miner in the AV settings.
If, for some reason, you run multiple AV programs, you will need to do it for ALL of them.
Let’s begin with One-Click Miner
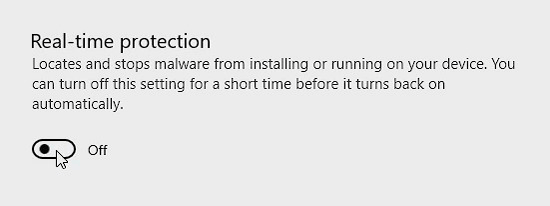
We start by disabling real-time AV scanning, just in case the AV software blocks the installation file from downloading.
Go into Windows Security > Virus and Threat detection, and click on Manage settings.
Set the switch to Off.
Download Safex One-Click Miner
Close the AV window, then open a browser window and go here to download:
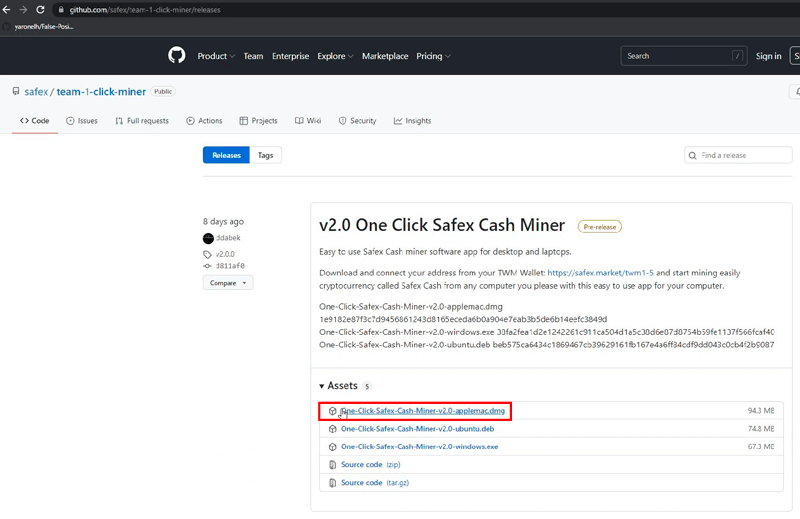
Click on the Windows installation file, and it will begin to download.
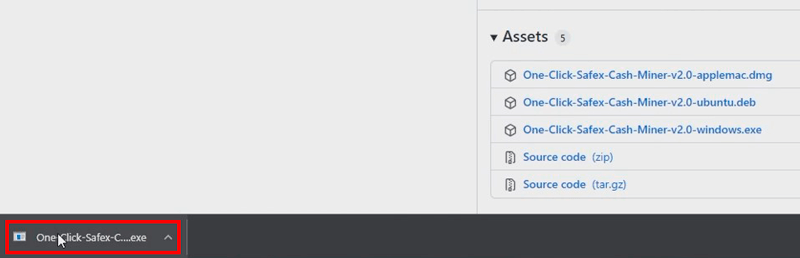
Once completed, click on the downloaded file to run it.
Because the software is only recently released, Windows Defender may still throw a warning screen. If so, click on more info and it will then display the Publisher information for the file:
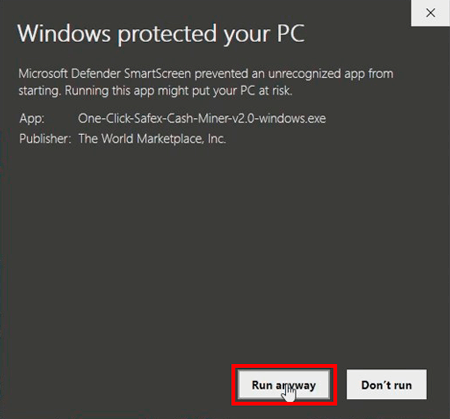
Click Run Anyway and the software will install and automatically start at the end of installation.
We need to set an exclusion in the AV program, and we also want to set the One-Click Miner to run in Administrator mode, to get a higher hashrate.
(Observant readers will note the Shield in the desktop shortcut for the One-Click Miner in the image above, indicating it is already set to run in Admin mode. That's because I’ve previously installed the software during testing of prerelease versions, and set them to run in Admin mode, and Windows remembered that setting and applied it automatically when I did this install.)
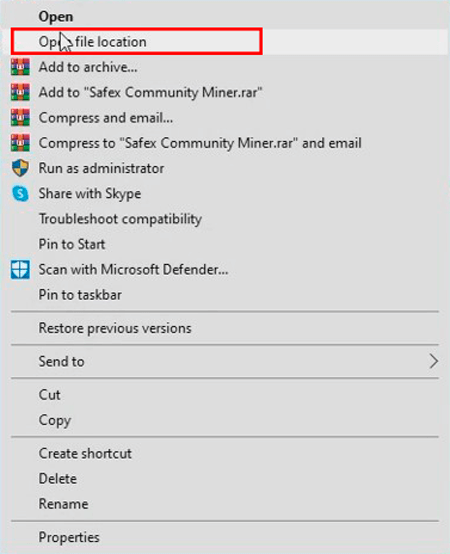
Right click the desktop shortcut for the One-Click Miner and click Open file location.
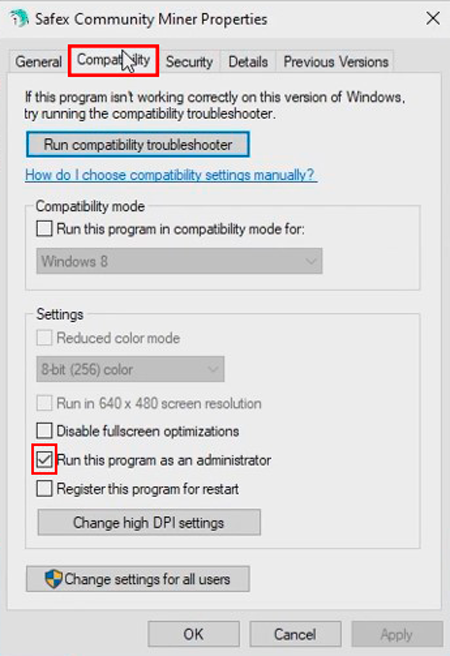
A window will appear showing the install folder for the One-Click Miner. We will first set the program file to start in Admin mode. Right click the Safex Community Miner file, then click Properties.
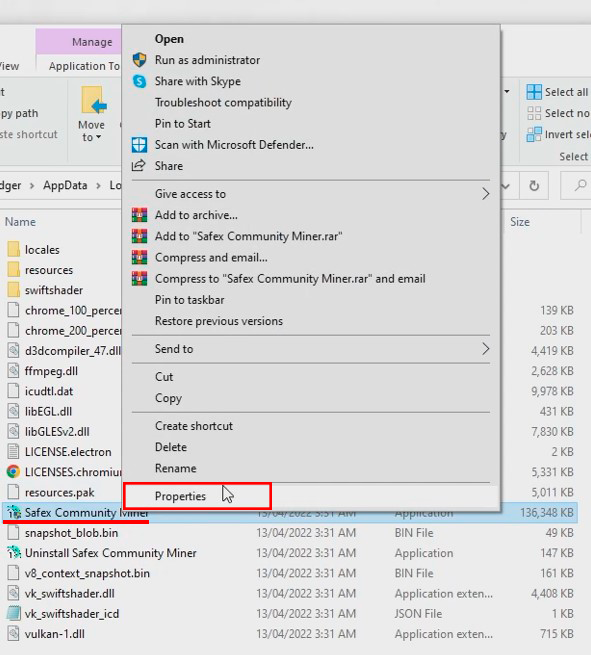
Click on the Compatibility tab, and ensure there’s a tick in the checkbox beside Run this program as an administrator. Then click Apply and OK to close the window.
Back in the installed folder window, click to the right of the folder path:
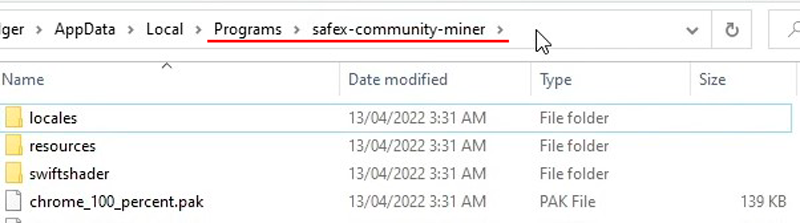
To highlight it:
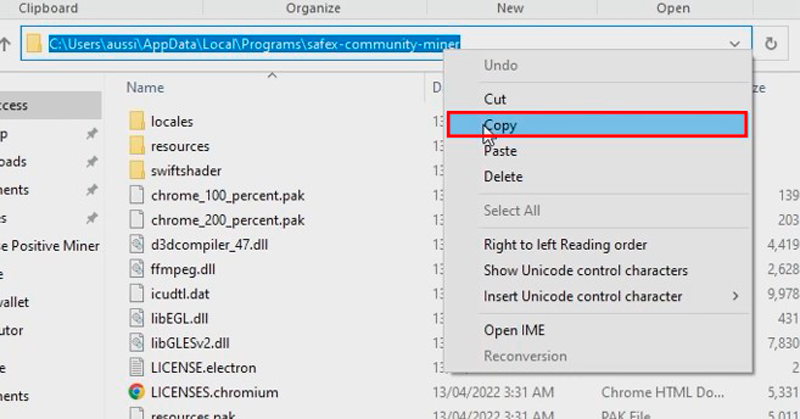
And now right click the folder path and click Copy.
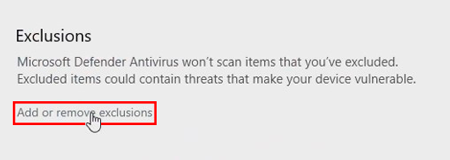
Open up your AV program again > Virus and Threat Protection > Manage settings. This time scroll down to Exclusions, and click Add or remove exclusions.
Click the Add an exclusion button and select Folder from the dropdown list.
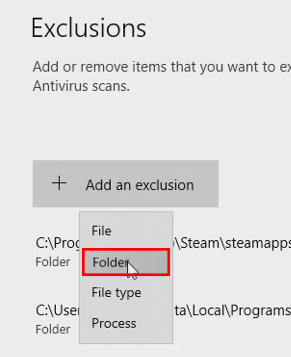
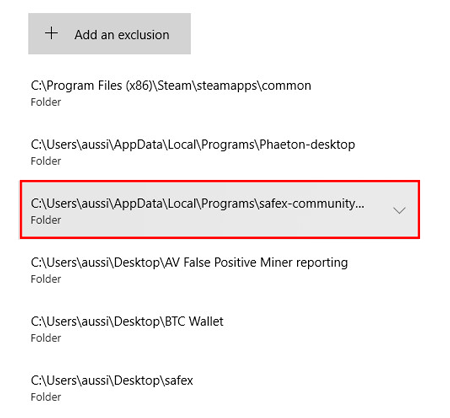
Past your copied folder path into the empty field, then click the Select Folder Button. The new exclusion will appear:
You can now turn real-time scanning back on in your AV program, and we can move on to starting the One-Click Miner.
Double-click the One-Click Miner shortcut on your desktop, and if you correctly set it to run in Admin mode, you’ll see the following warning popup:
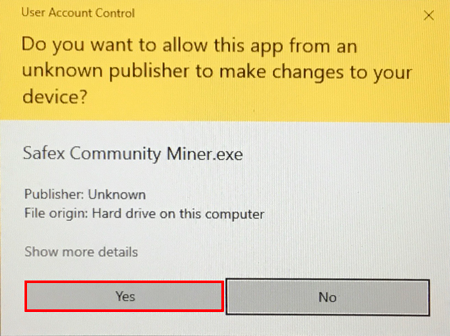
Click Yes to launch the One-Click Miner.
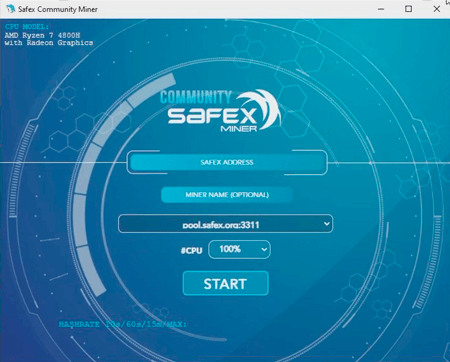
Safex Miner Settings
Copy your Safex address (from a text file or your Safex TWM Wallet) and Paste it into the SAFEX ADDRESS field of the Miner.
You can optionally add a Miner Name in the next field, although it isn't required.
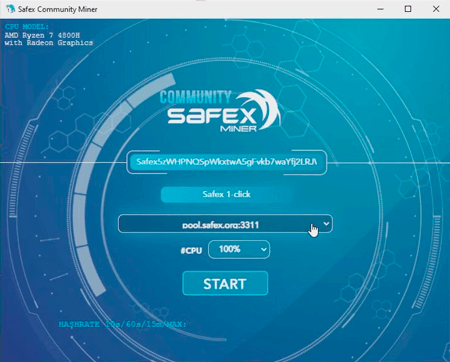
Then we come to the Mining Pools dropdown menu, which defaults to the official Safex.org pool.
You can leave it on the default pool and just hit the START button to begin mining.
The Safex.org pool is based in Poland.
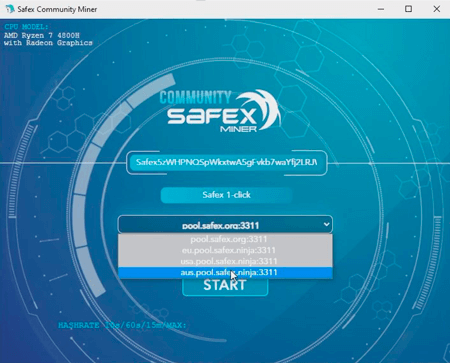
However, depending on your location, you may want to choose a different pool, and the other 3 options in the dropdown are located in:
- Europe (Netherlands),
- USA (Chicago),
- Australia (Sydney).
I’m choosing the AUS pool, because I’m based in Australia.
Once you’ve settled on your preferred mining pool, you can optionally change the CPU percentage if you don’t want it mining at 100% (default).
Changing the CPU% doesn’t always change the mining efforts of your PC. Each mining thread requires 2MB of L3 Cache. In my case, because my laptop has 16 threads but only 8MB of L3 cache, it makes no difference what I set it to, because it can only mine with 4 threads anyway, and so it is L3 Cache limited to 25% through my hardware specifications. [Given the limited cooling capacity of laptops, mining at only 25% is probably not a bad idea anyway.]
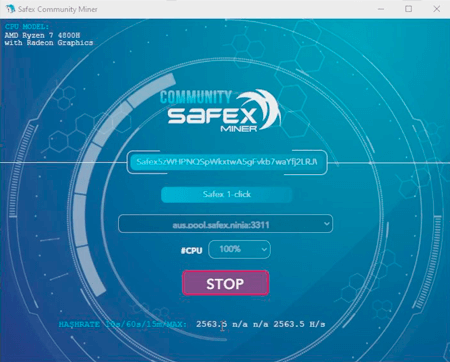
Hit the START button to begin mining. After about 10-15 seconds, a Hashrate should appear.
If it only shows Loading on the HASHRATE line, it isn’t mining, and it most likely has something to do with AV interference, if you didn't set the exclusion correctly, or perhaps you have another AV install you forget about.
Technically, that’s all you need to do, and Safex Cash will come trickling into your Wallet as your mining efforts reach the minimum payout level of the mining pool you selected. However, if you plan on accumulating those mining rewards in the long-term, to spend on purchasing goods on Safex Market, then I recommend you increase the payout amount. See here for why this is important.
Mining Pool Statistics
Regardless of the above, you may just want to check your mining progress on the pool website from time to time. Simply go to the mining pool website that you chose in the dropdown (without the “:3311”. Eg. For the Safex.org pool, you head to pool.safex.org.
As I used the AUS pool, that is what I’ll be using below.
So I head to aus.pool.safex.ninja in my web browser, and in the Worker Statistics page, I enter my Safex Address into the field and click the Lookup button on the right.
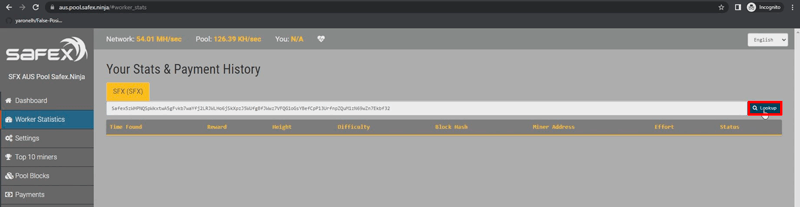
All the information about my mining contributions to the pool then populate. As I’ve been mining to this pool with several Mining rigs for some time, there’s already a lot of data there.
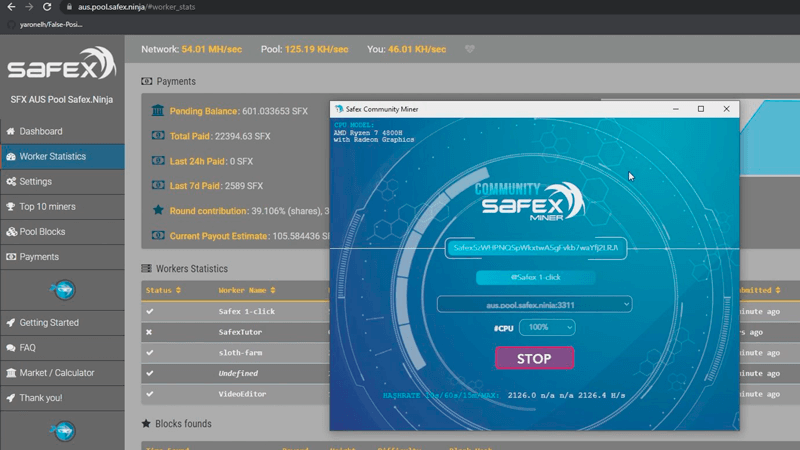
Note: In the instructions above, I entered a Miner Name Safex 1-click, then selected the AUS pool. When I clicked start, the miner name showed up as undefined. This is because all SafexNinja pools require an @ at the start of the miner name. After I stopped the miner and changed the name to @Safex 1-click in the miner name field, the name appeared correctly in the pool Worker Stats after I started mining again, as can be seen in the image above.
Changing your Mining Pool payout is done in the Settings page (or Worker Settings, depending on the pool), and has been fully explained here.
You may see a discrepancy between the hashrate showing in the One-Click Miner, and what the mining pool sees it as. Generally, the reported hashrate will be about the same as the miner hashrate over the 24-hour average. The way pools calculate miner hashrate, and many other aspects of mining, are explained in that other article linked in the previous paragraph.
The 1-Click Miner is simply an easy-to-use GUI set atop the regular xmrig mining software, so the references to xmrig in that mining pool article apply equally to the One-Click Miner.
A final point to remember: Each time you launch the One-Click Miner software, you need to enter the information into the fields again before you start mining. If you don’t select the same pool as you previously used, any accumulated SFX in the old pool balance will be lost after a couple of weeks, as pools deactivate data from inactive miner addresses to save on resources.
If you want to change mining pools, do so when you have a negligible balance on the pool you’re leaving (eg. just after you get a pool payout).
That’s all there is to the Safex One-Click Miner. A simple, uncluttered interface that even a novice PC user can get installed and running, to start mining Safex Cash.
If you use Mac, your mining will be easier simply because there is no need to deal with antivirus systems. Follow the Mac guide if needed.
Happy Mining!